RS Paint RNG
Introduction
After doing a few RNG manips in a copy of Pokemon Ruby or Sapphire you may notice that the dry battery initial seed (5a0) does not have many great spreads for stationary and wild Pokemon. You might be able to get 3 or even 4 perfect IVs if you are patient, but what if you want 5 or 6 perfect IVs? Well there is a solution for all you dedicated IV hunters out there. If you want that 6 IV Shiny Modest Rayquaza, you’ll need to gather your skill and take it to the contest hall, as we’re going to look at some paintings!
Necessary Guides:
How to RNG Wild Pokemon in R/S/E
How to RNG Stationary Pokemon in R/S[a][b]/E[c]
How to RNG TID/SID in R/S[d][e] (Optional if you want a high IV shiny)
In Game:
A team of Pokemon that can use needed HMs and can fight your target, all but 1 must be fainted
1 surviving Pokemon
A free slot in your party
A Pokemon with Sweet Scent if you target is a wild Pokemon (not stationary or gift)
Repels if needed to reach your target
Access to a Contest Hall with a winning Pokemon painting (Does not have to be your Pokemon)
A way to catch a Pokemon quickly (Masterball is highly recommended)
Several Rare Candies to check IVs
Your TID/SID combo [f](Optional, only needed if you want a shiny[g])
All trainer battles between your path and your target defeated
Optional but highly recommended:
A Black Flute
A Pokemon with Stench in the lead slot of the party
A Cleanse Tag given to the lead pokemon
A winning Master Rank Contest painting in the Lilycove Museum
Out of Game:
Pokefinder 4.0.1 by AdmiralFish (Releases · Admiral-Fish/PokeFinder)
Gen 3 Seed Assistant by PapaJefe (Releases · jjaldridge2009/Gen-3-Seed-Assistant)
Flowtimer by Stringflow (GitHub - stringflow/FlowTimer)
Blisypaint by Blisy (Paint Seed Flowtimer Converter)
A copy of Pokemon Ruby, Sapphire, or Emerald (This method works on emerald, however battle records make this easier. Use [insert emerald paint guide link here] for Emerald if you are in the post-game)[h][i][j]
A Programmer Calculator (Windows has one built into its calculator program)
Take note that this RNG is extremely difficult, as it requires 2 frame perfect inputs and contains a bit of luck depending on your pathing. I highly recommend [k][l]not making this your first stationary or wild RNG encounter in the third generation.
Why Paintings?
The painting in the Fallarbor Town Contest Hall, image taken from Shiny Perfect Legendaries....From a Painting?
As mentioned earlier, the initial seed of a dry battery copy of Pokemon R/S does not have many good spreads early on. So for years, the best ways to get perfect spreads was either to do egg RNG or wait real life days for a good spread to appear. However, it was recently discovered that for some bizarre reason looking at a painting will re-seed the game based on the state of a value known as VCounter1. This value is equivalent to how many frames have passed since the game’s last soft reset or hard reset, and is unaffected by NPC advances, which makes it very ideal for picking whichever new seed our desired target is closest to. Remember that the third generation GBA pokemon games run at 60 frames per second, so this counter increases quite rapidly. So rather than waiting days to find a perfect spread for our target on seed 5a0[m] (or 0 if you use emerald), we can now fully utilize all of the initial seeds of R/S/E! This drastically lowers the time between attempts, as we can pick seeds that have 5 or 6IV spreads early on. The only downside is we need to run to encounter our desired target to encounter it as well as get the correct seed on the same attempt. Saving the game with a new initial seed does not “keep” it, the game will boot up using seed 5a0 again. All of this explanation is to state that the painting method is double frame perfect. This means that we need to get two 1/60th of a second button presses on a successful attempt or it will not work.
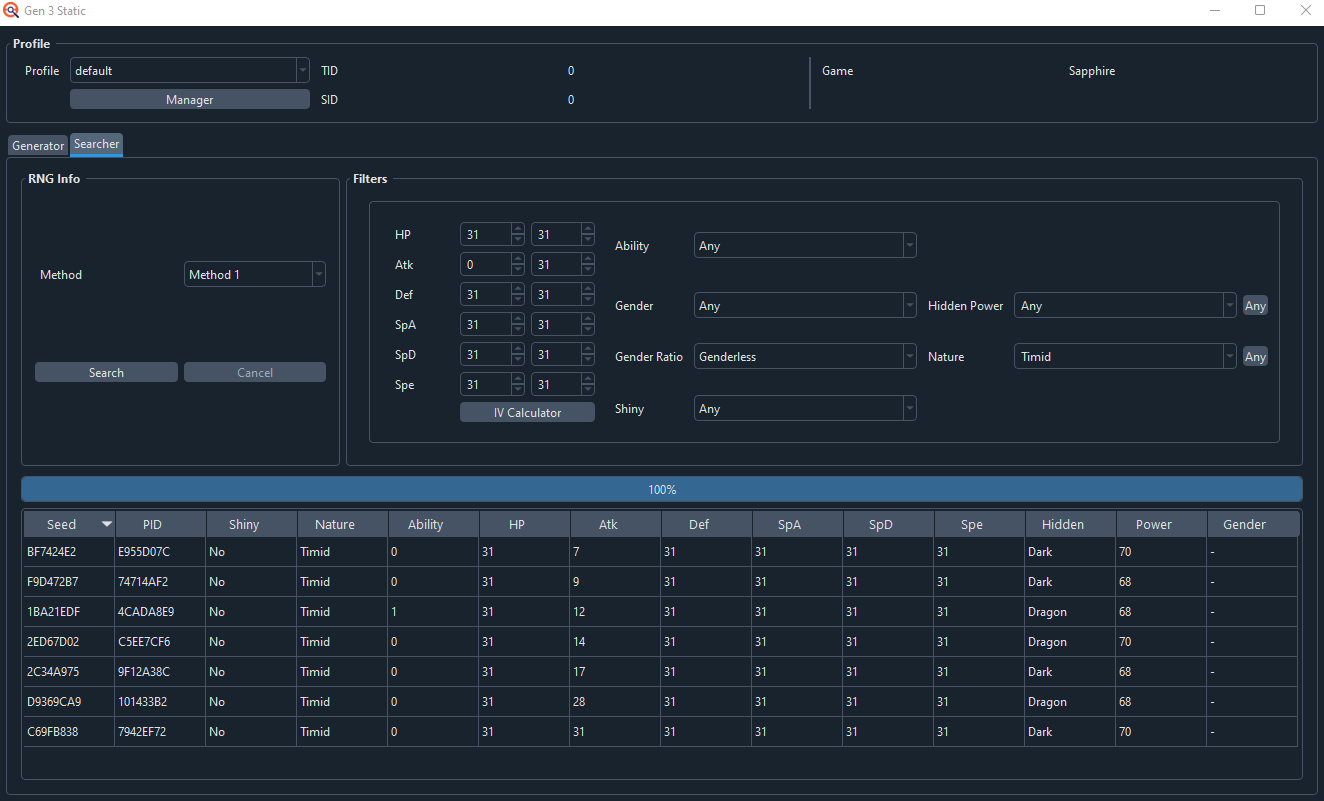
Before doing any setup in-game, we first need to find a good target spread. To do this, open Pokefinder and select either the Gen 3 Wild Tab, or the Gen 3 Stationary Tab depending on what kind of Pokemon your target is. The example I will use for this guide is the Southern Island Latios in my copy of Pokemon Sapphire, so I will select the Stationary Tab, and head to the searcher tab. Enter the minimum and maximum values that you want your IVs to be set to, along with your desired nature, then hit search. I’ll be looking for a Timid Latios with 31/x/31/31/31/31 IVs.
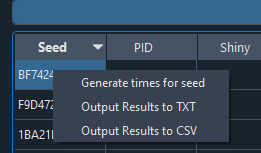
A few results should pop up. Any of these spreads would work for this Latios, but we need to find out which one has the shortest wait before it can be encountered. To do this, we need 2 values. We can get both of these by right clicking any result in the seed tab, and then click “Generate times for seed”
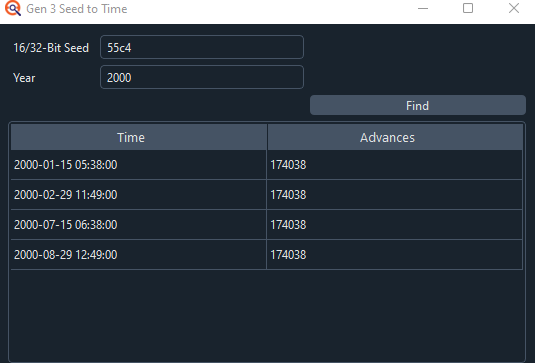
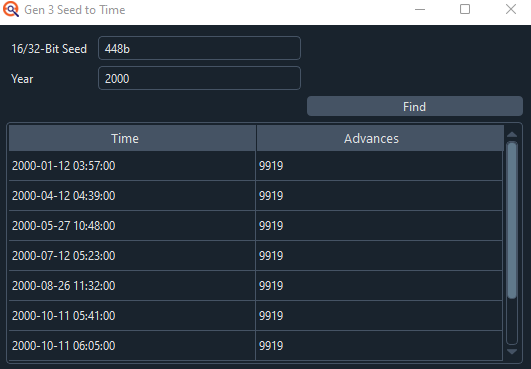
A new window should pop up, which will list both the 16/32-bit seed, along with the shortest advances to reach this target pokemon.
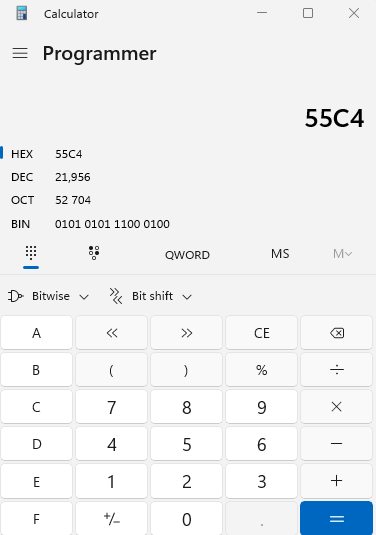
In this first example, we first need to find out what our seed is in decimal. Whenever you get a seed from this window it will be in hexadecimal. With our programmer calculator, we can convert this hexadecimal value into a decimal value.
Our decimal value in this case is 21956. This is how many frames we need to wait before interacting with the painting to get our new initial seed. In this case, since Ruby and Sapphire run at 60 frames per second, it is roughly a 6 minute wait in front of the painting to get this seed. That's pretty good! However we also need to pay attention to the advances tab. This is how many advances we need to wait AFTER interacting with the painting to encounter our Pokemon. In this case, that value is a whopping 174038. That would be an agonizing 48 minute wait! In total, resets for this particular Latios would take 54 minutes. While this is much faster than days, this is still far too long for what could be considered reasonable. So check each of the spreads that you would like, and compare their total wait time.
For a 5IV Latios, after comparing all the ideal spreads, the PID 7942EF72 has the shortest wait. (It also happens to be 6IV instead of 5IV, which is a funny coincidence.) Converting our hexadecimal seed to decimal gives us a value of 17547, which is just under a 5 minute wait. Our advances are even shorter, at 9919 advances, or just under a 3 minute wait. This means that we can encounter this spectacular Latios with only 7 and a half minutes of waiting!
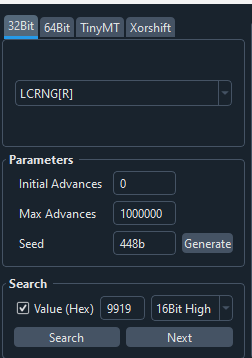
One last thing to keep in mind about finding an ideal target is having too SHORT of a wait. Some extremely early seeds might not be available due to having to mash past the menu at the start of the game, and some early advances may be too quick to reach your target from the painting in time. Take note of how to get to your target Pokemon, and make sure to factor this in as well. If this is the case for your chosen spread, you can use pokefinder’s researcher tab to find the next closest seed with your chosen spread. I’ll take the Latios seed we just got as an example even though it is a good seed already. Open the researcher tab from the tools menu in pokefinder. You’ll be presented with a whole bunch of options, but we’ll only need to enter a few things.
For the first tab, set it to LCRNG[R]. Then add in how long you are willing to wait after the painting in the max advances tab. We’ll need to enter the seed for our target in the seed box, and enter the number 0 in the value (hex) box. Lastly, change the box next to it to be 16 bit upper, and then select the generate button. A whole bunch of options should pop up, but we can find the one we want by hitting the search button.
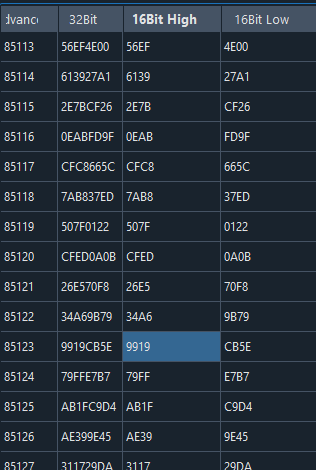
A result is highlighted! What this means is that the 16bit low value is the next closest seed, with the advances being what our new total advances would be after pressing A on the painting. In this case, the next closest seed with our 6IV timid Latios is CB5E, and we would have to wait 85123 advances after interacting with the painting to encounter the pokemon. You don’t HAVE to use this value if one of the other seed/advance combos from the first part has less of a wait, but if you need a very specific PID to be used, this is your best bet if your wait happens to be too short.
If you want a particular spread of your choosing to be shiny, you’ll need both your trainer ID and secret ID. There is a very low chance that a 5 or 6 IV spread is shiny on a given TID/SID combo, so if you want your high IV Pokemon to also be shiny, you’ll have to RNG your TID and SID in a new save file and play until you can encounter your target. There is a guide for that linked at the top of this guide. I RNG’d my TID and SID at the start of this file already to make this spread shiny, so I have completed this step.
Once you’ve found your ideal target, you’ll then need to change these advance values into milliseconds for use in flowtimer. Fortunately, Blisy has made an excellent web page for this purpose called BlisyPaint.
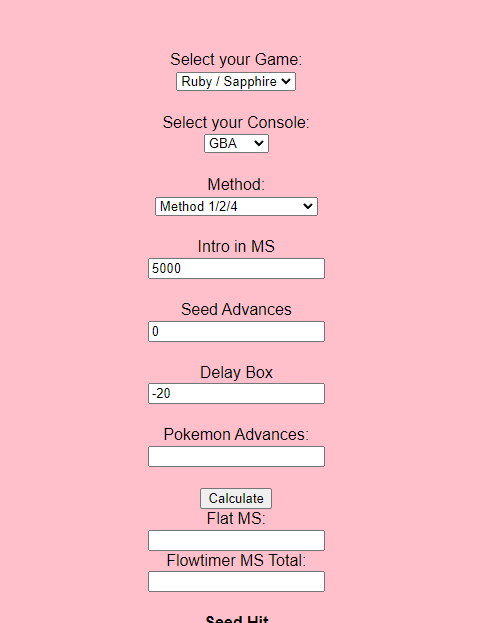
Here you’ll see a few different options for setting up the flowtimer. The game is already set for Ruby and Sapphire, so that does not need to be changed unless you happen to be using emerald. The second option is for the console the game is being played on. If you are using a GBA, a GBA SP, a gameboy player or a gameboy micro, choose the GBA option. If you are using a nintendo DS, a nintendo DS lite, or a 3ds virtual console inject, use the NDS option. The third box is for the method used to generate your target Pokemon. There are options for Method 1/2/4, and Sweet Scent (Indoor and Outdoor). Select the option that fits your target Pokemon. The difference between Outdoor and Indoor Sweet Scent is noted by the color of the background of the field move where it is used, black for Outdoor and blue for Indoor.
An example of the black background for outdoor sweet scent, image taken from GUARANTEED WILD SHINY POKEMON IN RUBY AND SAPPHIRE(How to RNG Manipulate Wild Pokemon in RS)
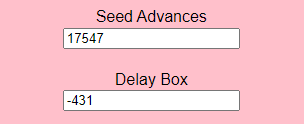
Selecting either of the Sweet Scent options will automatically fill in its respective delay in the delay box. Leave the intro in MS box as it is, as that is the timer that counts down for you to soft reset the game. Paste your frames for your seed in the seed advances box. For the Latios example, that would be the 17547 calculated earlier, which was 448b converted to decimal.
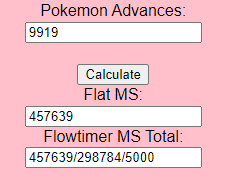
You can also put 0 in the delay box, rather than -20 if you are going for a stationary. Lastly, put the Advances number from Seed to Time into the Pokemon advances box. The Latios has 9919 advances before it is generated, so I will put that into the advances box. Then hit calculate.
This will give us two sets of numbers. The first is our total milliseconds in the Flat MS box, which we can ignore for this RNG. The second is the value we need to paste into flowtimer. If you haven’t used flowtimer, I’ll give a quick explanation.
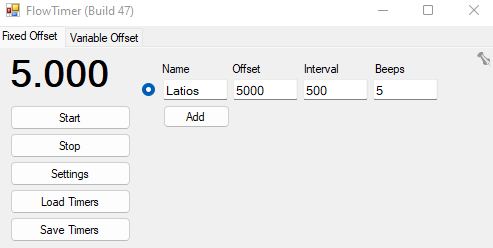
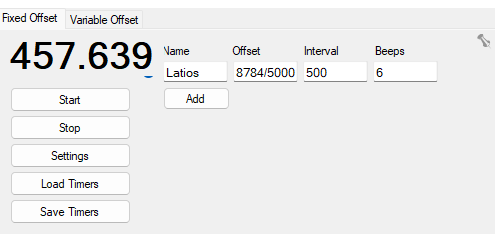
Here you’ll see a blank timer, which you can name whatever you choose. Paste the value in the “Flowtimer MS Total” into the offset box, which will update the big timer on the left. If you are used to Eon timer or its equivalents, I highly recommend changing the beeps number to be 6 rather than 5 to match Eon timer.
Now our out of game setup is done! When the start timer button is clicked, or a key of your choosing is synced up to it in the settings menu and pressed, the timer will begin and have 3 distinct intervals. The first set of beeps is to line up the soft reset for the game. The second set is for pressing A to interact with the painting. Lastly, the third set of beeps is for encountering the Pokemon, and the timer will finish.
Now that the timer is ready, we need to take all the necessary steps for preparing the RNG. The first and most important step is creating a path to your target which interacts with the smallest number of NPCs and places for wild encounters. It might not be possible to avoid these entirely, as almost every stationary has some degree of moving NPCs or grass/cave/water tiles on your way to the encounter point. The amount of random events that can occur along your route adds to the variance that may be experienced for the second advancement check. If your encounter has potential for random encounters along the way, it may seem like simply using a repel will prevent any of the random encounter checks from disrupting your encounter advancements. However, the game will still check for random encounters, you just won’t be sent into battle with the repel up. The cleanse tag, if given to the lead Pokemon, and the stench ability, if the Pokemon with the ability is in the lead slot, will both reduce these checks to decrease the variance between attempts. In addition, using the black flute item each time you enter a new map (such as walking into a building, or a cave section) will reduce encounter checks as well.
The best way to start any path is by using a white out warp after interacting with a painting. This is done by having your last surviving Pokemon faint due to poison by taking a step in the overworld.
The message that appears right before warping to a pokemon center
Doing a white out warp will take you to the last Pokemon center you walked into. This is ideal for preventing any random NPC movement from within the contest hall rooms themselves. The best place to do a white out warp from is the upper floor of the Lilycove Museum, using a winning painting from a Master Rank contest. There are no moving NPCs in this room, so there won’t be any random advances from starting a path this way. However, it can be quite time consuming to win a Master Rank contest, and if you do not want to go through that effort (or you haven’t reached Lilycove yet), the Fallarbor Contest Hall is the second best place. There is only 1 NPC who can move, and they’ll freeze the instant you take a step to white out. So they only have an extremely small window to move. If you are using emerald, only the Lilycove Contest hall will have paintings by default, so I highly recommend the Museum strategy. There are much more NPCs in that contest hall compared to Fallarbor, so the variance between attempts may be a bit high.
Pathing- Pokemon Center to Destination
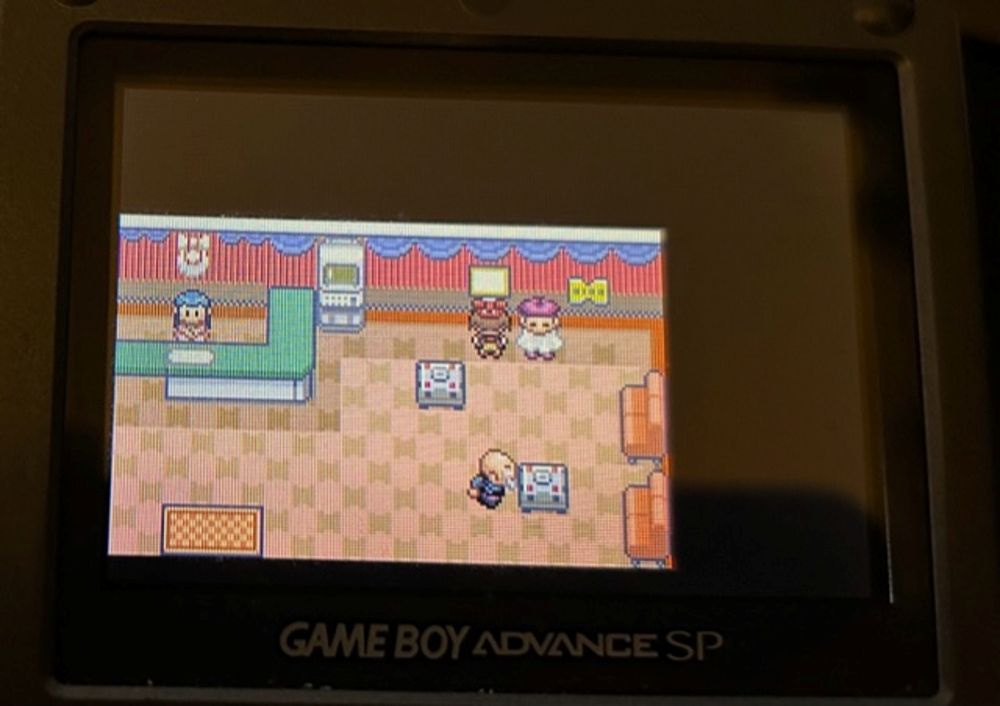
When a white out warp is executed, your character will move to be standing in front of the last Pokemon center the player entered. Note that in Ruby and Sapphire, there is no animation that plays within the Pokemon center when whiting out due to poison, you’ll simply be standing outside the center, so there is no need to worry about NPC interference from the NPCs that can move within an individual Pokemon Center. From here, try and be as creative as possible planning the best route to your Pokemon. It doesn’t have to be the fastest route, it just has to minimize as many random events as possible. Southern Island Latios has a great path that I will be using developed by Chris Ellis, and modified for the white out warp. Intuitively, one may think that the best way to Southern Island is to white out warp to the Lilycove Pokemon center, run into the harbor, and sail to Southern Island, as it is the fastest way to get there. However, there are many moving NPCs in Lilycove, and there is a sailor in the harbor itself who can move as well. To avoid the most NPCs that I can, I will white out warp to Pacifidlog Town, since there are no moving NPCs there. Then I’ll fly to the Battle Tower, and run to the ferry.
These 3 NPCS on screen are the only ones that can move as you rush downwards towards the ferry on the pier, image taken from https://www.serebii.net/rubysapphire/battletower.shtml
There are 3 NPCs who can move in this area, but this is much better than the amount in Lilycove. I can then take the ferry to Lilycove, and once there, turn and mash A as fast as possible to speak with the attendant again, triggering the Southern Island event. This prevents the sailor in the harbor from moving.[n][o] So in total, there are only really 3 NPCs who can move and 0 chances for wild encounters, which is excellent for a path. If you are confident in your bike skills and can be consistent with your movement, this can speed up your path to minimize NPC movement and reduce encounter checks compared to running. Feel free to test your path from the Pokemon center a few times before setting up the warp, to both practice your movement and see if you can make it to your target within the time limit.
Setting up the White Out Warp
Before heading to the painting, we first need to faint all the Pokemon in the party except for one. The easiest way to do this is to use the duo of Gabby and Ty, who can be found on Route 111, 118, or 120. They will always trigger a double battle, where you can faint all your Pokemon except for one, and poison the remaining one yourself. Their highest level for their pokemon is only 39, so make sure your strongest pokemon can quickly KO the others in your party if they are of higher levels. If none of your party Pokemon can easily inflict poison, take the last pokemon to the Fiery Path and do it there. The Fiery Path can spawn Koffing, Grimer, and Slugma, all which can inflict poison. A poisoned Pokemon takes 1 HP of damage for every 4 steps in the overworld. By tracking your Pokemon’s remaining HP, you can line it up to be right in front of a painting with 1 step remaining before your Pokemon takes its last bit of damage. Once you are standing in front of the painting with that condition satisfied, save the game. In the case where you need to move through areas with random encounters, make sure your lead Pokemon is higher level than the wild Pokemon so the repels will work.
When you have one remaining step until you white out, save in front of the painting of your choice. After interacting with the painting, your seed will change, then taking a step triggers the white out warp.
Now, you can begin the RNG attempts for your target. Follow the beeps for flowtimer, and once the second set of beeps finishes, press A to interact with the painting, then mash B to exit the painting. Moving in any direction from here triggers the warp, and you can then move to your target along your path.
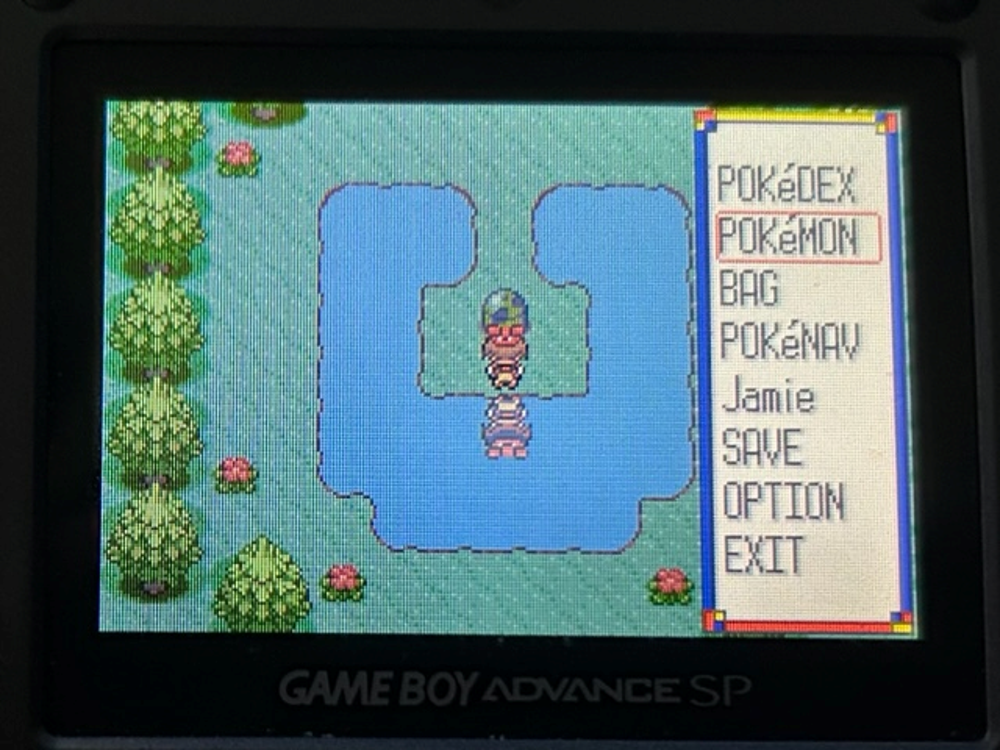
Opening the menu when you are at your encounter spot can help reduce random advancements and is a good habit to have.
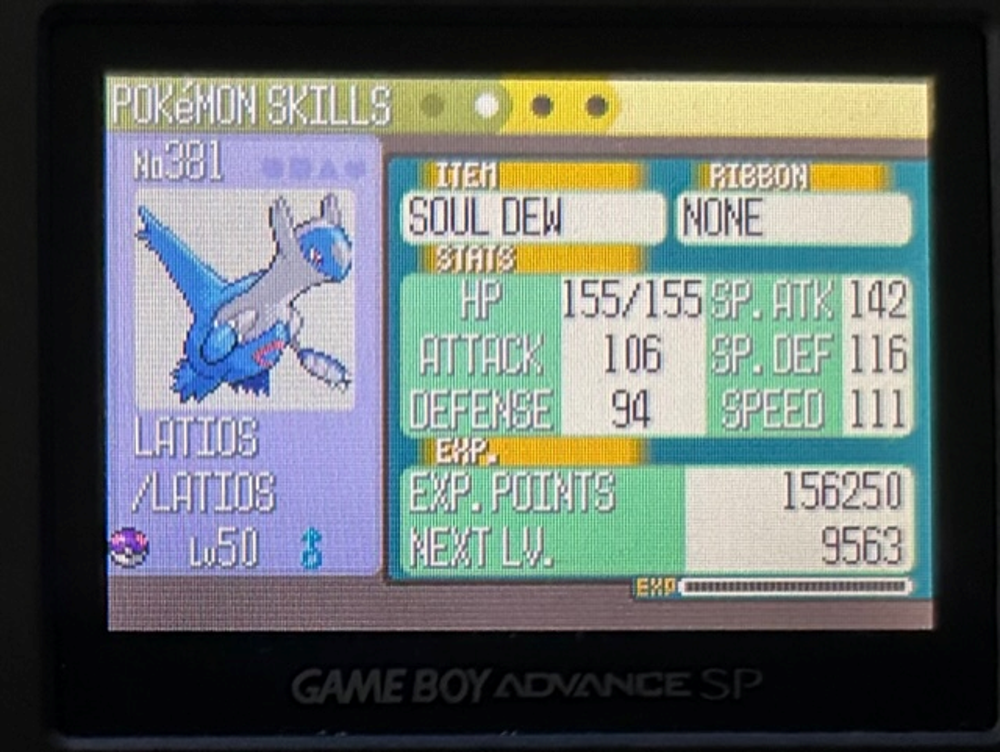
When the final timer finishes, you’ll encounter your target, and almost always miss it on the first attempt. I recommend that you catch it quickly, as any additional time spent catching will increase the overall wait time between attempts (Master ball works wonders here). A good chunk of the 3rd gen legendaries also have recovery moves, which further increases the time needed for catching if you cannot taunt or sleep them. Take note of its stats, then open up Gen 3 seed assistant.
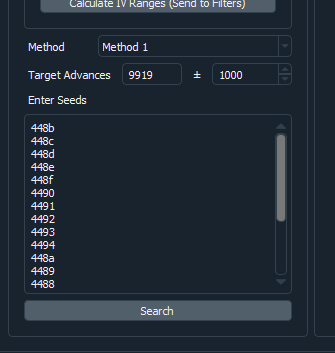
Gen 3 seed assistant looks very similar to Pokefinder, but it has unique features that make it ideal for checking a few seeds rather than the 1 or all nature of Pokefinder. By plugging seeds into the box on the lower left, Gen 3 Seed Assistant will only check those seeds for the stats that you enter in. I recommend checking 10 seeds above and 10 seeds below for your first attempt, along with a range of 1000 frames in case your delay or randomness along the path changed. Remember seeds are in hexadecimal, so the numbering system wraps from 9 to A, then F to 0.
You can save the seeds you entered onto a notepad in case you return to this RNG over a few days.
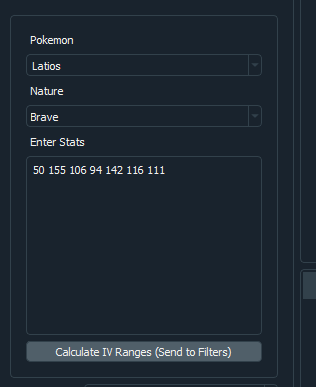
After this, enter the stats of your target into the box on the upper left. If you use rare candies to check its exact IVs, you can enter multiple levels of stats by hitting the enter key and starting a new line.
Hitting the calculate button moves these stats into the filter section automatically. If you are trying to find a wild pokemon, changing the method allows you to select which pokemon you found on a specific route, narrowing the results even more. After hitting search, you should get some results. In my case, I got no results for this Latios. If this happens, you can remove the seeds from the lower left box by using the cut command to paste them in later, and hit search. This will take a while, but eventually the program will give you results.
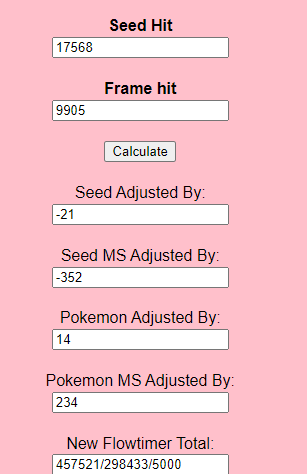
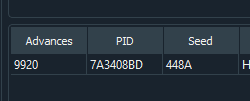
In my case, the first option is much more likely than the second, as 44A0, while off target by several advances, is significantly closer to our seed. Now we can take these values back to BlisyPaint to create a new flowtimer value. Plug the Seed into the programmer calculator again to get its value in decimal. In my case, I got 17568. After this, put them into the BlisyPaint tool.
This has adjusted our total timer, and we can put this new total back into flowtimer and try again. You can reduce your range on your target advances to ±100 after the initial calibration. Keep repeating these steps until your seed and your advances are within a few advances of your target.
Once you get to a spot like this (1 early on seed, 1 late on encounter), you don’t have to keep adjusting the flowtimer as 1 advancement is within the realm of human error. Keep persisting and eventually your target will appear.
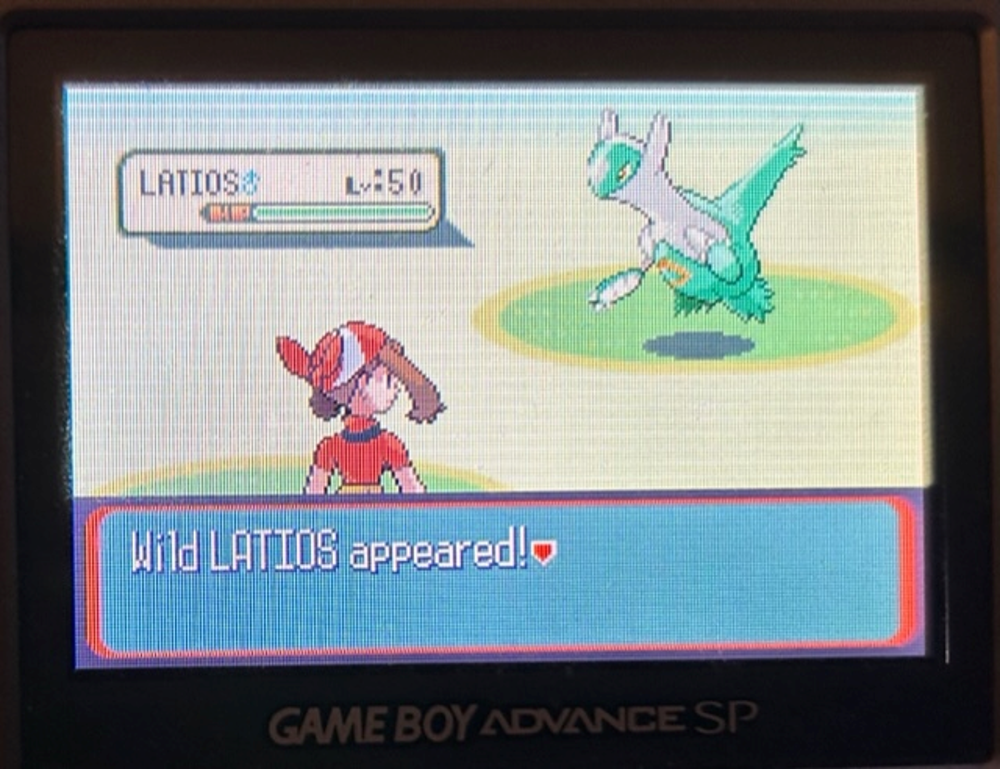
Voila! After a while, (This took me about a week worth of attempts), your target will show its face. In this instance, this Latios was shiny since I had RNG’d my TID/SID combo at the start of this save file. If you did not do this, you probably won't be able to tell if you hit your target until after you catch it. Additionally, it is wise to check its stats and nature before saving even if you got a shiny, as there is always a tiny possibility there is another shiny frame close to your target.
I had Pokerus on several Pokemon in my party, this Latios got infected as soon as I caught it. Saves me from spreading it on later I guess!
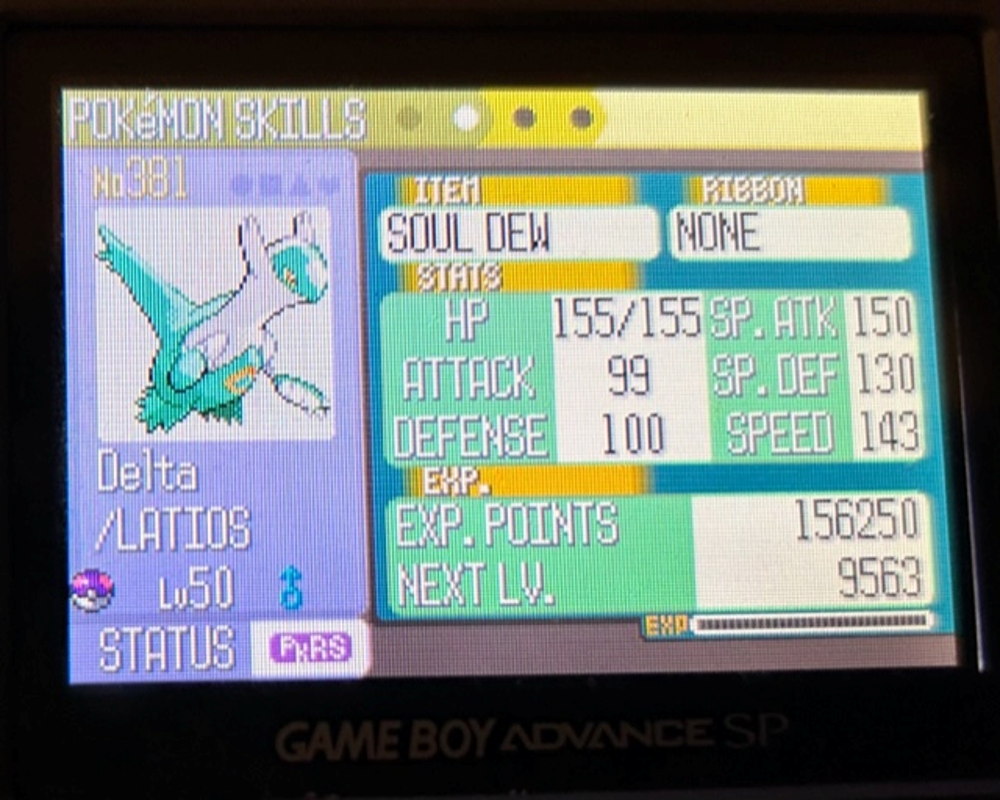
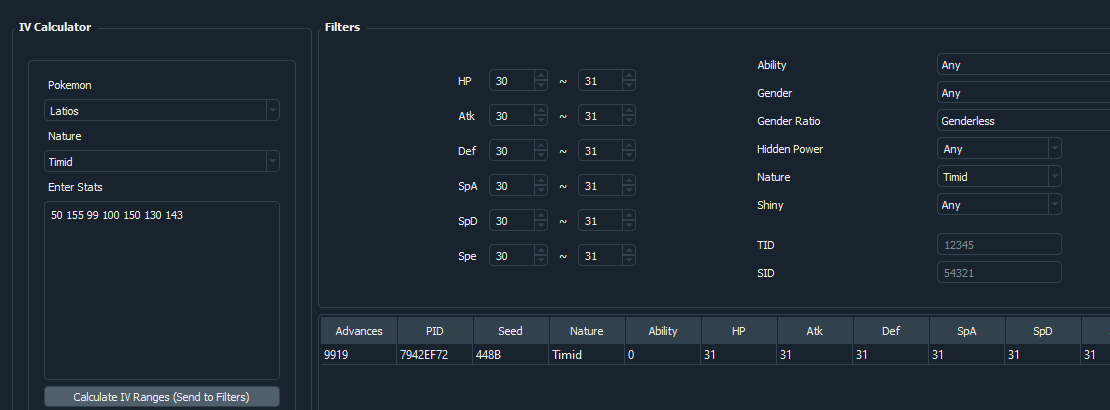
Well, this Latios has incredible stats! Let’s plug them into the Gen 3 seed assistant to check if it's the correct frame.
And there it is! The 6IV, shiny, timid Latios caught using the R/S Painting method. Now save the game, and reap the rewards of your RNG journey!
The R/S painting method is one of the most difficult RNGs of the 3rd generation, but is very unique in regards to both its double frame perfect timing and pathing to get to your desired target. There really isn’t a hunt quite like it, and I highly recommend this RNG for a veteran looking for a new way to try RNGs, or players looking for those high IV legends without access to a copy of Pokemon Emerald. With the battle record saving in Emerald, this eliminates both the double frame perfect timing and the pathing required in R/S, which makes the process much easier. I still believe R/S painting is one of the most rewarding RNG hunts I’ve done, and I hope that this guide can lead others through a long yet memorable RNG method.
Credits
Jedi Master JAN (Author)
Lappy (Editor)
Shao (Editor)
Admiral Fish (Pokefinder Creator)
Papa Jefe (Gen 3 Seed Assistant Creator)
Im A Blisy (Creator of Blisy.net and the BlisyPaint tool)
StringFlow (Flowtimer Creator)
ZSpica (Highlighted better strategies for setting up the white out warp and reducing ecounters)
